
Alain Lompo
Senior Developer (ehem.)
Turning our acceptance tests into a high added value deliverable.
Content
- Prologue
- 1. What is FitNesse?
- 2. Where can FitNesse be found?
- 3. First experiences with FitNesse
- 4. Under the hood
- 4.1 FitNesse test systems
- 4.1.1 FIT
- 4.1.2 SLIM
- 4.2 Integrating FitNesse in our project solution
- 4.2.1 Generating a new project using maven goals
- 4.2.2 Our business scenario
- 4.2.2.1 The interface to the calculator model
- 4.2.2.2 The API implementation
- 4.2.2.3 The LoanCalculator service
- 4.2.2.4 Automating the FitNesse test in our build process
- 4.2.2.5 Adding a wiki test page
Prologue
What are our tests but a witness to the integrity of our code? Just like what takes place in a justice court when a witness swears to tell the truth, all the truth and nothing but the truth, so are we doing the same through our tests. Sprint after sprint or iteration after iteration we ship tests along with our main software code components and we are in a way trying to convince whichever person of interest out there, that we are shipping the true (agreed upon) deliverable, all the true and nothing but the true.
That means also that we are putting no credit at all in Dilbert’s testing strategy.

The problem is that, we generally keep these valuable witnesses in the realm of developers and other techies, so that it becomes a safeguarded access ( if geek => AUTHORIZED, otherwise NO_TRESPASSING)
This observation applies not only to unit tests and other more technical tests but also in a very large part to acceptance tests as well. One may make the objection that we have such tools as Selenium or Cucumber for acceptance tests and that they are currently used to show case the team work in iteration reviews for example. But we cannot imagine a moment a PO running an Intellij or Eclipse IDE and looking into the code to find out how to rerun these awesome Selenium Tests. Suppose that she wants to run the acceptance tests using the newly deployed model calculator web service, there is no way she can do that unless a developer, a devop or an architect assist her. Suppose that she wants to run the acceptance tests against a different dataset (as she just received the last extracted anonymized snapshot dataset from a production server): she cannot do that unless she is assisted. These acceptance tests could also be used by her as a support artifact in an important internal decision meeting, but the level of confidentiality does not allow her to bring in an assisting engineer.
To summarize it could be of great interest to provide the project’s stakeholders with the ability to completely own the acceptance tests: that means to be able to access, customize and rerun the tests at will, without a mandatory assistance from the DOING team. The FitNesse framework provides this awesome feature as we will see soon. FitNesse is not limited to that though. Without no more delay, let’s get into FitNesse.
1. What is FitNesse?
FitNesse is a test tool that comes in a form of a wiki web server, it is not hard to learn and as a wiki, it stands as an excellent collaborative tool for example between the DOING team and the business stakeholders.
As a test tool each wiki page can be Test-Runnable or can be just an ordinary wiki page. This is very interesting because we can use it to directly test the specifications against the application itself. Since FitNesse is a wiki server, the requirements can be created and edited through the web browser. By writing specifications (or Acceptance Tests) we can create a common understanding among the team (developers and non-developers).
The intermediation chain is therefore shortcut and the risk of wrong interpretations strongly reduced. The application becomes the direct interpreter of the specifications and the specifications become the unique validator of the code’s correctness.
2. Where can FitNesse be found?
The FitNesse framework can be downloaded directly from the official website. It comes in two versions:
- The standalone (fitnesse-standalone.jar) version which can be used independently in order to run FitNesse by itself (like a fat jar it embeddes all the necessary dependencies that it needs)
- The fitnesse.jar version which is meant to be integrated in your project via build tools like Maven or Ivy.
3. First experiences with FitNesse
In order to quickly start with FitNesse and have an overview of its capabilities, download the standalone version from the website mentionned above and save it in a folder that we will refer to as §FITNESSE_HOME
Now use a terminal to navigate to $FITNESSE_HOME and run the follwing command java -jar fitnesse-standalone.jar, you should receive an echo similar to this one (I am using cygwin on Windows):
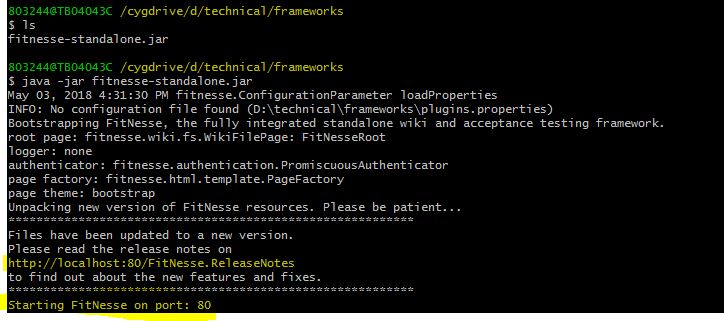
In case you are already using the default port (as it is often the case) turn the former command into something similar to java -jar standalone-fitnesse.jar -p 9292 and the FitNesse wiki server will start on a different port.
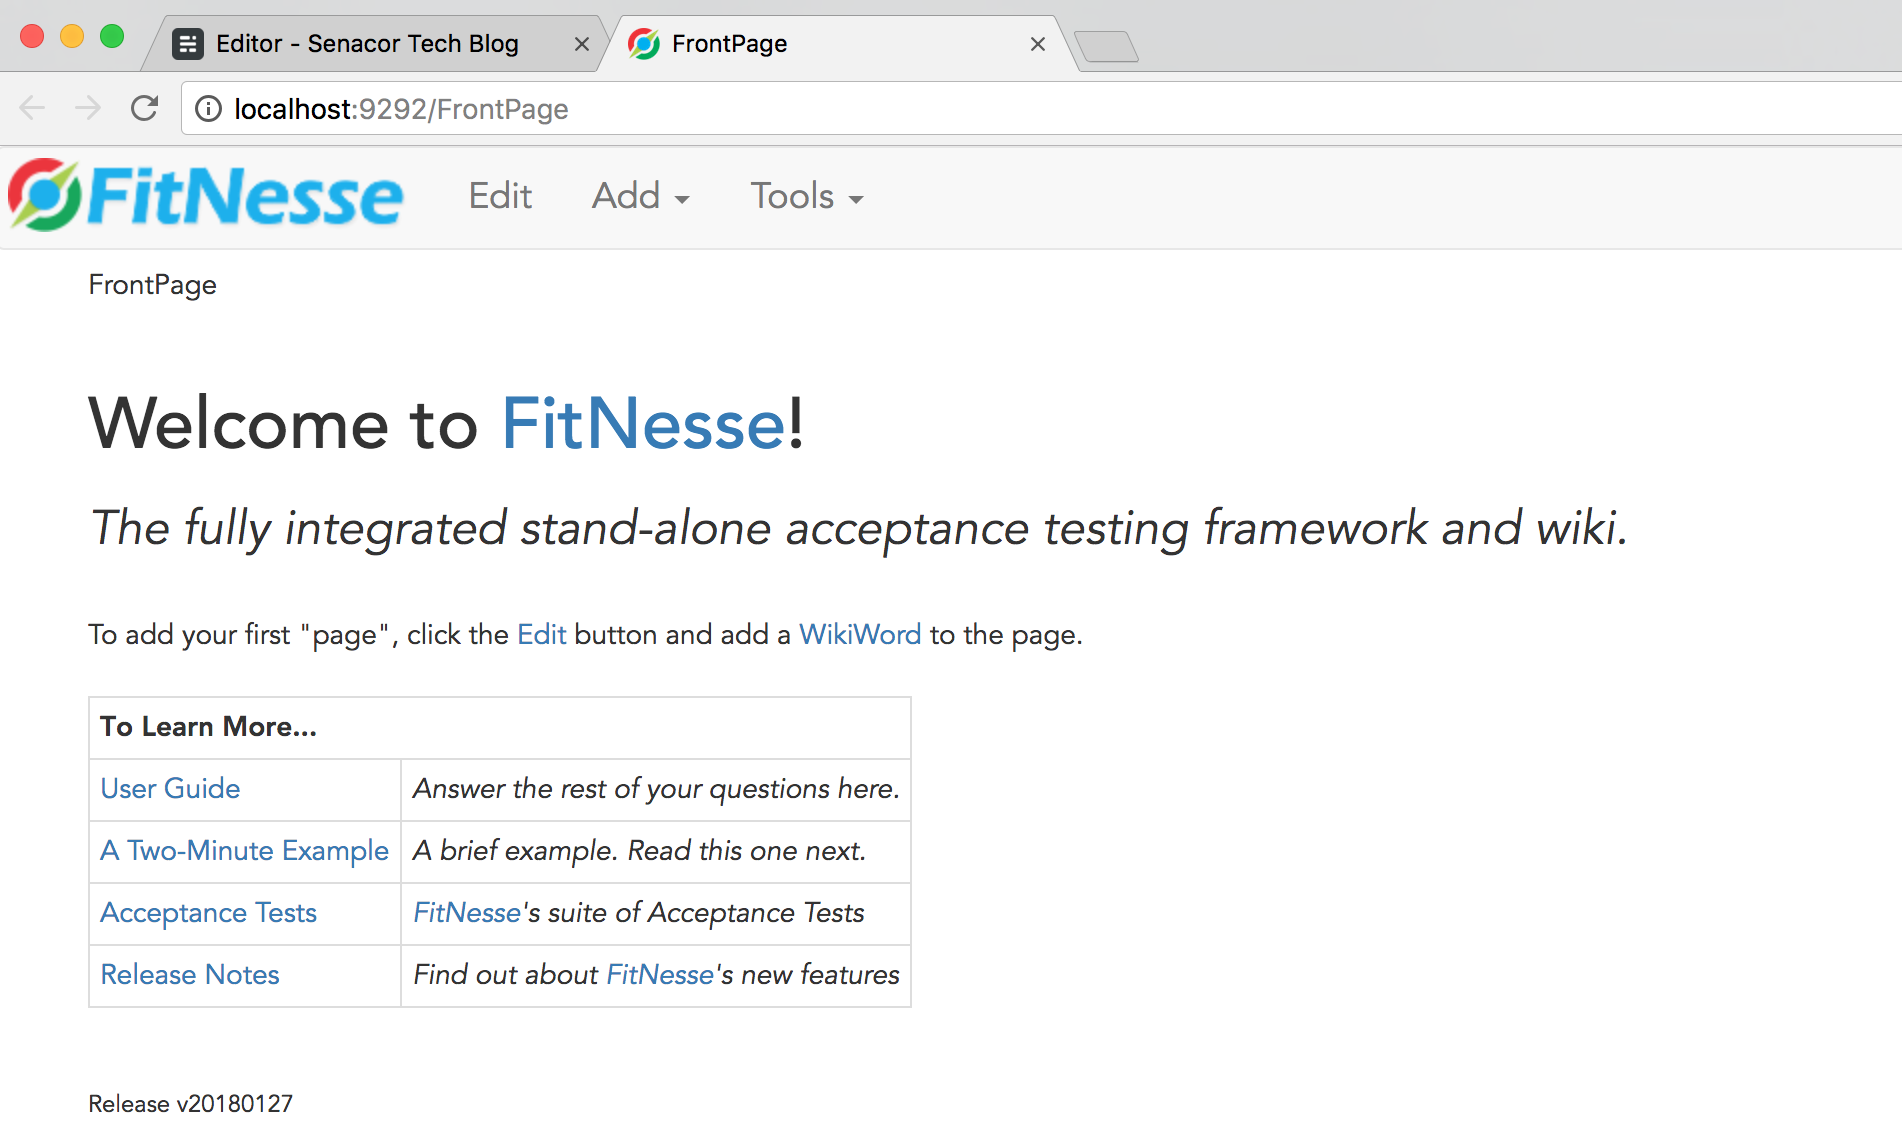
Now you can use your favorite browser to access the wiki: simply navigate to http://localhost:9292/FrontPage to access the wiki’s front page (replace 9292 by whichever port you have picked up). The front page should by now be rendered into your browser and you should see something similar to the following:
To quickly get a taste at what FitNesse can do, click on the link titled: A two-minutes example. On the newly opened page, notice the Test Element of the top navigation bar: click on it and observe what takes place. The result should be similar to the following:
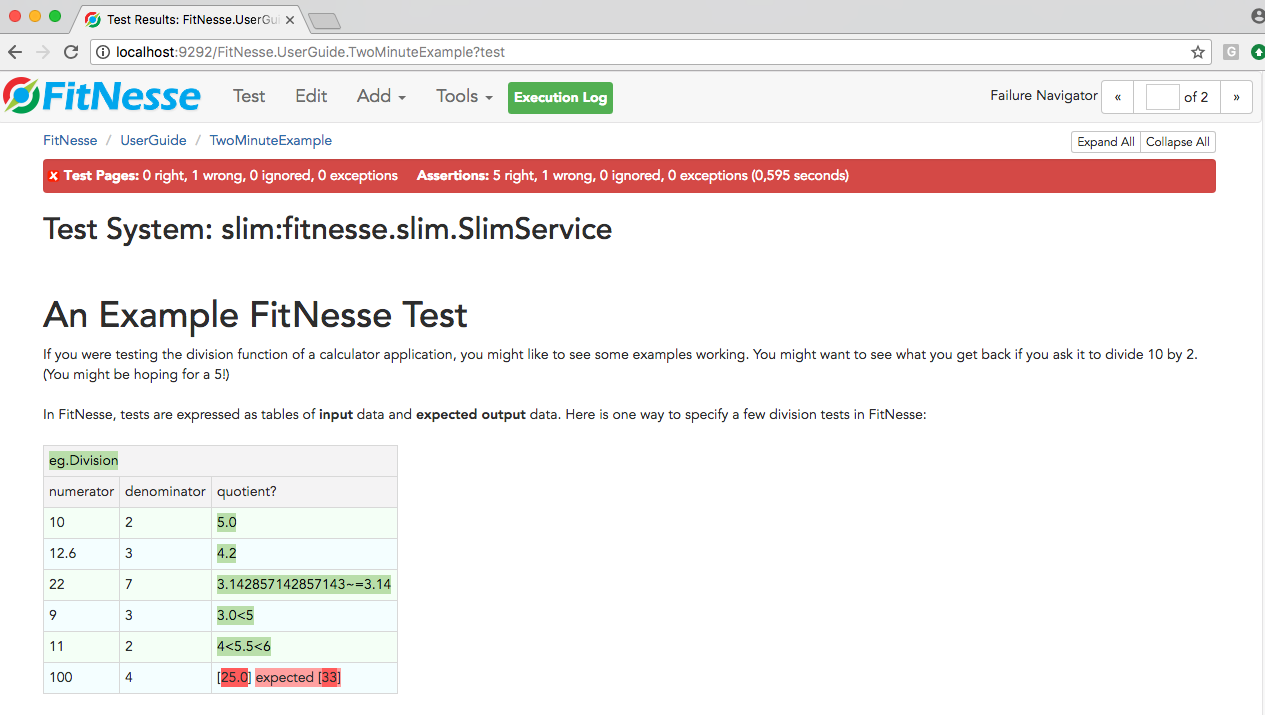
One can easily understand that a Division function is under test here and that the decision table provides both input values and expected results for the function, that is the function is being tested for correctness against many use cases. Since the fourth of a hundred is not 33, our test fails globally and the guilty line is highlighted in red and we also receive a global failure error message with corresponding statistics.
Notice the question mark after the quotient column, this is how we tell FitNesse that it is the expected result column.
Well to fix the test, simply edit the table as you would do any wiki table and write in the right value. Save your changes and test again. This time everything should be green (in case you did not notice it, the Edit link is right after the Test link).
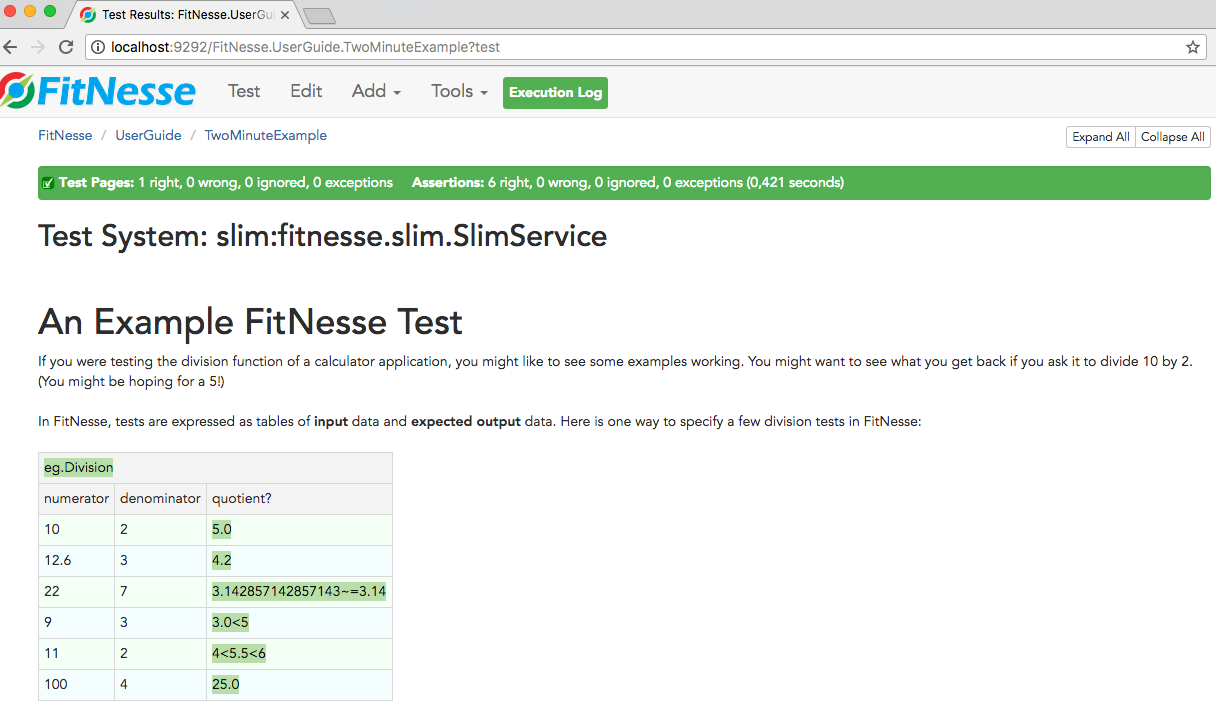
In such a simple case as this one, we may already have enough test datas, but what if we needed more input datas to test more cases? Again that is as simple as adding new lines into a wiki table.Let’s assume for example that we want to check that our division function gives the right result for 141/3. Click again on the Edit link and add a new line at the end of the table that contains the values 141, 3 and 47.0 respectively, then save and Test again, you should have everything green again. You may add as much lines as you want to keep on testing the function, everthing should work like a charm.
4. Under the hood
How does FitNesse functions under the hood? How are these decision tables made Test-Runnable? FitNesse works with two test systems, the Fit Acceptance Testing Framework and the SLIM Test System.
4.1 FitNesse test systems
The following picture describes how FitNesse works with Fit and SLIM.
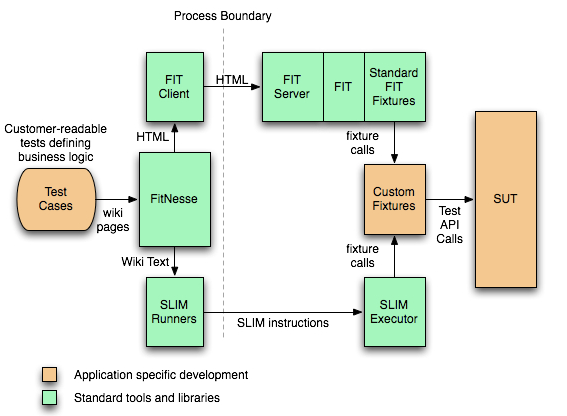
4.1.1 FIT
FIT (aka Framework for Integrated Testing) is the engine that processes the FitNesse tables. The test tables make reference to some corresponding ‚Fixture Code‚. FitNesse acts therefore as a Web client to the FIT engine and greatly facilitate the creation, the execution, the organization and the distribution of FIT tests accross the development team.
As a FitNesse user, the work of FIT is completely hidden from our sight and we do not need to worry about it.
As in the examples done above we can see that every table starts with a name that will be resolved as the classname of a Fixture Code that will interpret the rest of the table. The rest of the rows in a test table will depend on the style of table and fixture we are currently using: to each style corresponds a specific style of fixture code.
Here are a few most common and less frequently used table/fixture styles:
Most common:
- Column Fixture: this is the style already used in above examples
- Row Fixture: this style is best used with testing queries that should return an exact set of values
- Action Fixture: best used in order to emulate (via a script) a series of events (such as simulating a user navigating through the pages of a web site, like what can be done with Selenium or recorders of tools such as Gatling and JMeter).
- Comment Tables: allows the insertion of tabular comments that will not be executed as tests.
Less used:
- Row Entry Fixture: an extension of the column fixture that allows processing rows of datas.
- Table Fixture: This style allows the creation of a completely customized test table format and also to process it in a customized fashion.
- Summary Fixture: This style allows the generation of a report of all the tests on the page.
4.1.2 SLIM
SLIM (Aka Simple List Invocation Method) is an alternative to FIT. SLIM does not run all the HTML processing, the comparisons and the test result highlighting in the system under test but it keeps it in FitNesse. A very tiny kernel that implements the Slim protocol is executed in the SUT: this is simply a RPC system through which FitNesse can call the functions of the SUT.
The SLIM protocol is simple enough to be ported on new platforms within a few hours of work. On the other side all the test tables remain consistent regardless of the platform of the SUT because all the features reside on the FitNesse side.
In order to use the SLIM test one should set the TEST_SYSTEM variable to slim instead of fit.
!define TEST_SYSTEM {slim}
SLIM is shipped with a good bunch of table types: the first cell of a table tells you what type of table it is. Following is a list of existing table types:
- Decision table: this is similar to the Fit Column Fixture, it provides the inputs and outputs for decision
- Baseline decision table: similar to a decision table but it is made more readable for big table as only the difference from one line to the baseline are specified.
- Dynamic decision table:this is similar to the decision table in its syntax but differs in its implementation because the columns headers are passed as parameters to the fixture’s implementation.
- Hybrid decision table: it’s a combination between the decision table and the dynamic decision table.
- Query table: similar to Fit row fixture it provides the expected results of a query.
- Subset query table: provides a subset of the expected result
- Ordered query table: similar to the Fit row fixture but the rows are ordered
- Script table: series of actions and checks similar to the Action Fixture with FIT
- Table table:Completely customizable table
- Import: provides the ability to add paths to the fixture search paths
- Comment: a table used to insert comments, otherwise it does nothing.
- Scenario table: a scenario table can be invoked from other tables
- Library table: this table installs fixtures available for all test pages
- Define table type: this helper table allows the definition of the default table type for named fixtures
- Define alias: this helper table allows the definition of alias names for fixtures
To dig deeper into these SLIM tables checkout the SLIM Test System wiki entry in the FitNesse’s user guide.
4.2 Integrating FitNesse in our project solution
So far we have played with FitNesse using the standalone version, now let’s see how to integrate it in our project solution via maven pom’s configuration.
The maven dependency for FitNesse can be found in the central maven repository, at the time of this writing the last version is: 20180127 but you can use any latest version at the time of your reading.
<!-- https://mvnrepository.com/artifact/org.fitnesse/fitnesse -->
<dependency>
    <groupId>org.fitnesse</groupId>
    <artifactId>fitnesse</artifactId>
    <version>20180127</version>
</dependency>
4.2.1 Generating a new project using maven goals
Let’s use a maven goal to generate a new project and use it as a representative of a normal project implemented by a DOING team. use a terminal to navigate to a folder of your choice, we will make reference to this project as $FITNESSE_WITNESSE_HOME
In the mentionned directory type the following maven command:
mvn archetype:generate -DarchetypeArtifactId=maven-archetype-quickstart -DgroupId=com.senacor.tech -DartifactId=fitnesse-witness -Dpackage=com.senacor.tech.fitnesse -Dpackaging=jar -Dversion=1.0.0-SNAPSHOT -DinteractiveMode=false
The command should work successfully, otherwise check for a typo or some similar issues.
Now you should have, under the $FITNESSE_WITNESS_HOME folder, a sub-directory called fitnesse-witness. go into the fitnesse-witness directory and verify that the project was correctly generated by typing a mvn command, for example mvn clean install, you should get the classic echo of a successfull maven build goal.
Now use your favorite editor to check your maven pom.xml file. It should look minimalistic with an old junit dependency version, you may keep that as is or better change it to a more recent junit version (such as version 4.12 or version 5.1.0, I am using 5.1.0 for this article).
Below are the dependencies and properties that I have configured in the pom.xml
<properties>
    <maven.compiler.source>1.8</maven.compiler.source>
    <maven.compiler.target>1.8</maven.compiler.target>
    <fitnesse.version>20180127</fitnesse.version>
    <assertj.version>3.9.1</assertj.version>
    <fitnesse.command></fitnesse.command>
  </properties>
  <dependencies>
    <!-- https://mvnrepository.com/artifact/org.fitnesse/fitnesse -->
    <dependency>
      <groupId>org.fitnesse</groupId>
      <artifactId>fitnesse</artifactId>
      <version>${fitnesse.version}</version>
    </dependency>
    <dependency>
      <groupId>org.junit.jupiter</groupId>
      <artifactId>junit-jupiter-api</artifactId>
      <version>5.1.0</version>
      <scope>test</scope>
    </dependency>
    <dependency>
      <groupId>org.assertj</groupId>
      <artifactId>assertj-core</artifactId>
      <!-- use 2.9.0 for Java 7 projects -->
      <version>${assertj.version}</version>
      <scope>test</scope>
    </dependency>
  </dependencies>
4.2.2 Our business scenario
Let’s consider the following scenario, which is used only for a demonstration purpose and is of course simplified as much as possible.
As part of the core banking modules that we are implementing for our customer we are required to implement a loan calculator. The current specification is about the implementation of the calculation of interest using a model generator that depends on the amount of requested loan as well as the duration in months of the loan.
- if the amount is less than 1000 euros or its duration is less than 12 months, the interest rate is 7.5%
- if the amount is between 1000 euros and 25000 euros or its duration is between 12 months and 36 months, the interest rate is 5%
- otherwise (for an amount greater than 25000 euros or a duration greater than 36 months) the interest rate is 3.75%
Our team came up with the following implementation:
4.2.2.1 The interface to the calculator model
We use java 8’s BiFunction here to define a model generator that depends on two parameters: the amount and the duration in months.
package com.senacor.tech.fitnesse.service;
import java.util.function.BiFunction;
/**
 * Created by alompo on 06.05.18.
 */
public interface InterestModelable{
    BiFunction<Double, Double, Double> generateInterestModel();
}
4.2.2.2 The API implementation
The implementation is made in the SimpleInterestModel class
import java.util.function.BiFunction;
/**
 * Created by alompo on 06.05.18.
 */
public class SimpleInterestModel implements InterestModelable{
    private static final Double BASE_INTEREST = Double.valueOf(0.075);
    private static final Double ZERO = Double.valueOf(0.0);
    private static final Double THREE_YEARS_IN_MONTH = Double.valueOf(36);
    private static final Double ONE_YEAR_IN_MONTH = Double.valueOf(12);
    private static final Double LOW_AMOUNT_VALUE = Double.valueOf(1000);
    private static final Double AVERAGE_AMOUNT_VALUE = Double.valueOf(25000);
    public BiFunction<Double,Double,Double> generateInterestModel() {
        return (amount, duration) -> {
            if (amount == null || duration == null) {
                return ZERO;
            }
            if (amount.compareTo(LOW_AMOUNT_VALUE) <= 0 || duration.compareTo(ONE_YEAR_IN_MONTH) <= 0) {
                return Double.valueOf(amount.doubleValue() * BASE_INTEREST.doubleValue());
            }
            if (amount.compareTo(AVERAGE_AMOUNT_VALUE) <= 0 || duration.compareTo(THREE_YEARS_IN_MONTH) <= 0) {
                return Double.valueOf(amount.doubleValue() * BASE_INTEREST.doubleValue()/1.5D);
            }
            return Double.valueOf(amount.doubleValue() * BASE_INTEREST.doubleValue()/2);
        };
    }
}
We will assume, for the sake of simplicity that this implementation is good enough to go to the next phase of testing.
4.2.2.3 The LoanCalculator service
The Loan calculator service injects a dependency on the model generator and looks like the following:
import java.util.function.BiFunction;
/**
 * Created by alompo on 06.05.18.
 */
public class LoanCalculator {
    private InterestModelable interestModelGenerator;
    public LoanCalculator() {
        interestModelGenerator = new SimpleInterestModel();
    }
    public double calculateGlobalInterest(double amount, double durationInMonths) {
        BiFunction<Double,Double,Double> model = interestModelGenerator.generateInterestModel();
        return model.apply(amount,durationInMonths);
    }
}
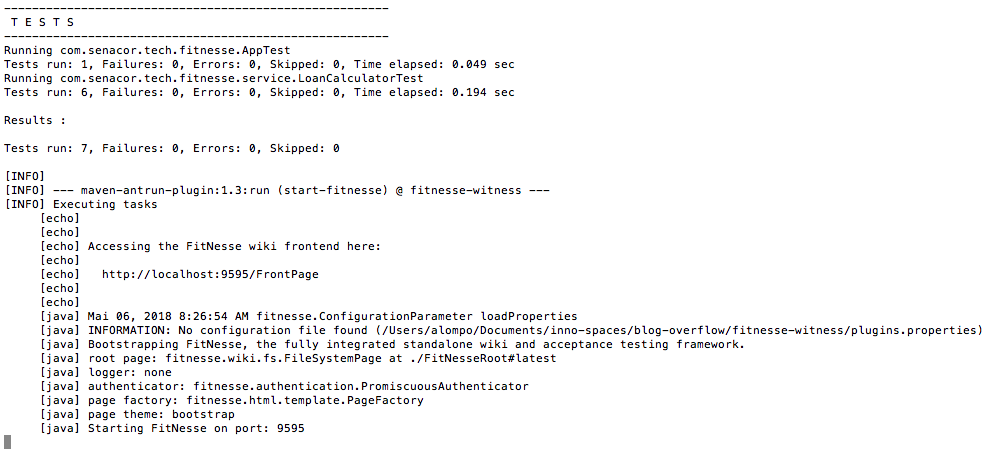
4.2.2.4 Automating the FitNesse test in our build process
Our goal is to ensure that this implementation is working just as expected. Therefore let’s create a new wiki page to test it.
First let’s automate the FitNesse tests in our build process: there are many waysto do that but we will use the maven-antrun-plugin in this demo.
So go ahead and add the following configuration to your pom.xml (you can use any port you want).
<build>
    <plugins>
      <plugin>
        <artifactId>maven-antrun-plugin</artifactId>
        <version>1.3</version>
        <executions>
          <execution>
            <id>start-fitnesse</id>
            <phase>test</phase>
            <configuration>
              <tasks>
                <copy todir="target/dependencies" flatten="true">
                  <fileset dir="../">
                    <include name="**/*.jar" />
                  </fileset>
                </copy>
                <echo message="" />
                <echo message="" />
                <echo message="Accessing the FitNesse wiki frontend here:" />
                <echo message="" />
                <echo message="  http://localhost:9595/FrontPage" />
                <echo message="" />
                <echo message="" />
                <java classname="fitnesseMain.FitNesseMain" classpathref="maven.test.classpath"
                      fork="true">
                  <arg line="-p 9595" />
                  <arg line="-d ." />
                  <arg line="-e 9999" />
                  <arg line="-b target/fitnesse-junit.xml" />
                  <arg line="${fitnesse.command}" />
                  <jvmarg value="-Xmx1024m" />
                </java>
              </tasks>
            </configuration>
            <goals>
              <goal>run</goal>
            </goals>
          </execution>
        </executions>
      </plugin>
    </plugins>
  </build>
You can use the fitnesse.command parameter that we configured into the antrun plugin to run all tests using
mvn test -Dfitnesse.command="-c MyTests.MySuite?suite&format=junit"
But for now let’s build our project again and check that we can access our wiki using the maven command: mvn test
Now that we have integrated the wiki into our build process, let’s go ahead and create a test page.
4.2.2.5 Adding a wiki test page
Nothing is easier than adding a new wiki page. To do that we simply need to edit any page and add a new WikiWord in it: for example LoanInterestCalculator. Let’s do that on the frontend page by adding a new row to the table that looks like the following
|[[Loan Interest Calculator][.FitNesse.LoanInterestCalculator]]|''Create your custom Fixture and test your code'' |
Saving the page and notice the interrogation mark link right after Loan Interest Calculator. Click on the interrogation mark and the new page will be automatically created in Edition mode. Let’s edit the page and making look like the following:
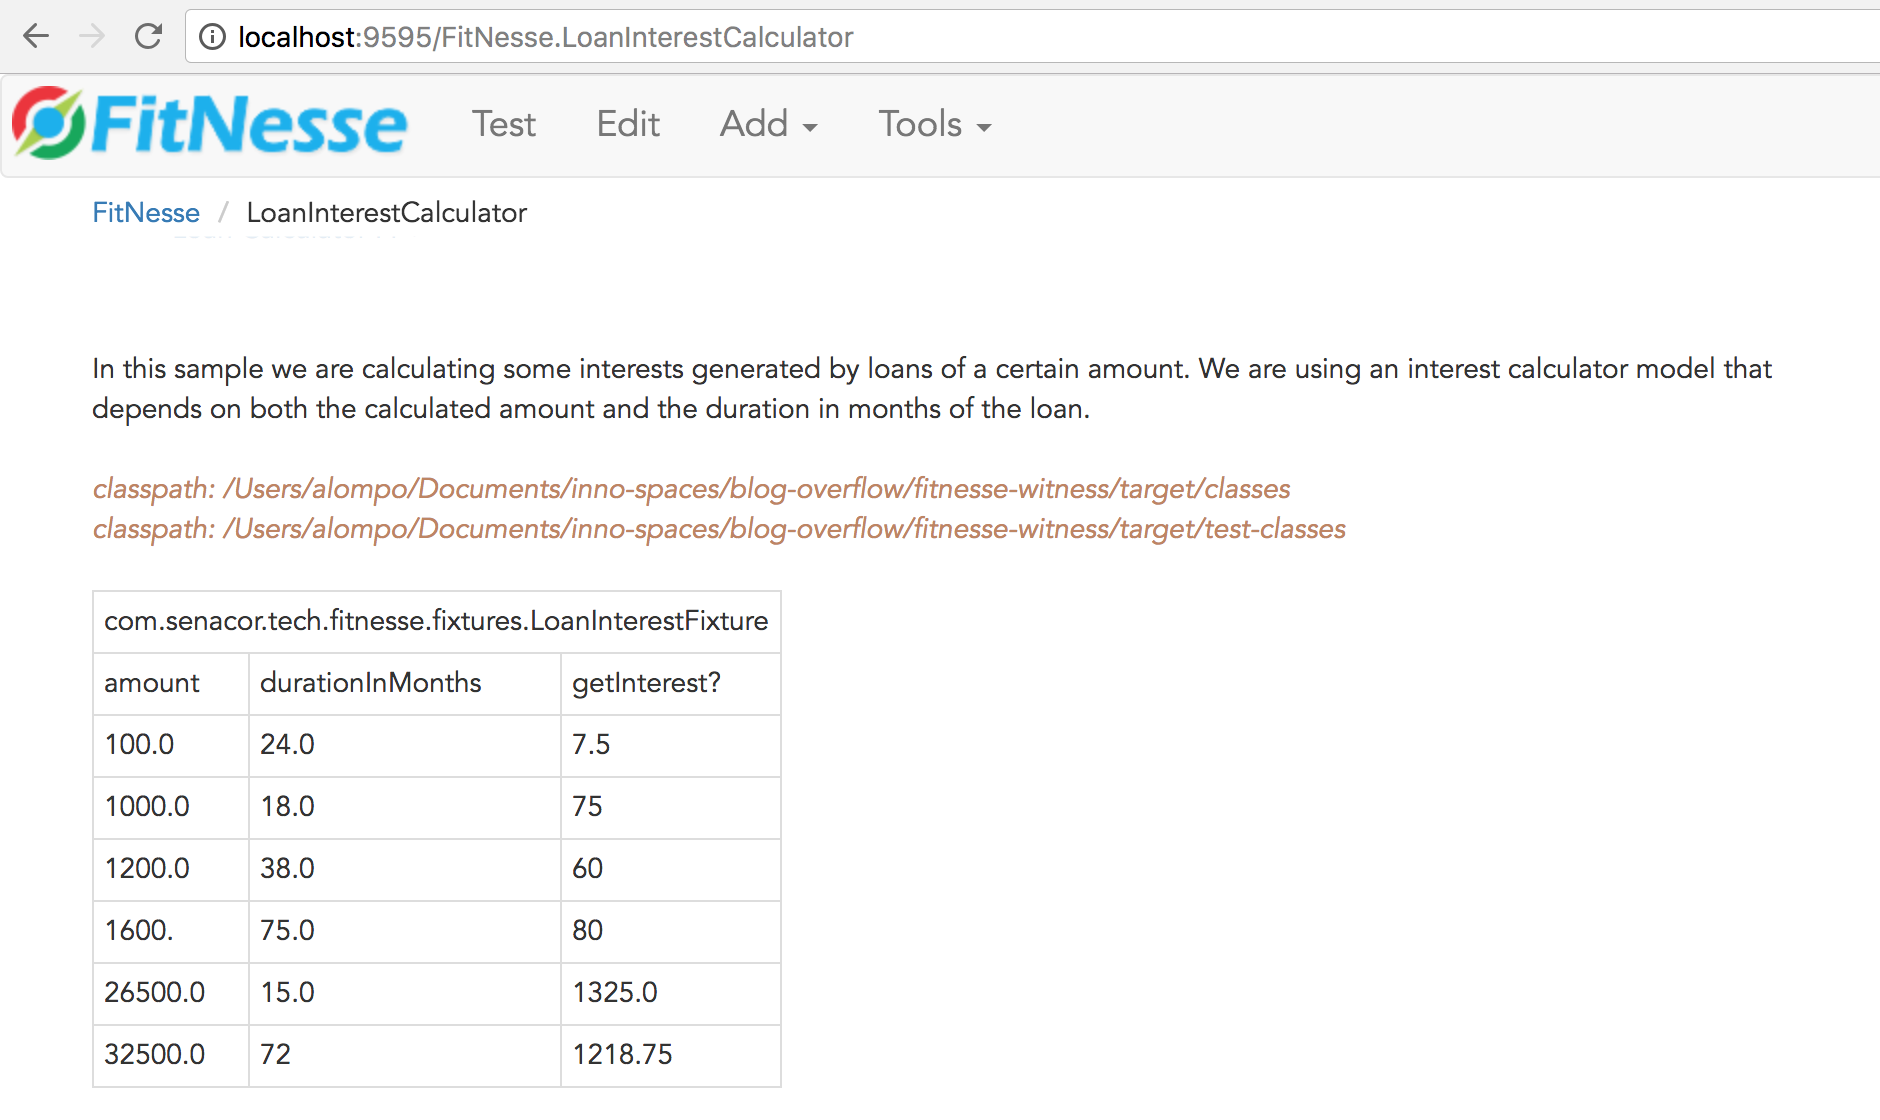
Ensure that the Page Type is defined as Test in the menu Tools => Properties.
As you may notice also, we should tell FitNesse where to find our classes and even though the rendered text mentions the word classpath we do this by using the !path keyword.
So be sure to add the paths configurations that are similar to these two but that matches the location of your fixture and service implementation codes:
!path /Users/alompo/Documents/inno-spaces/blog-overflow/fitnesse-witness/target/classes
!path /Users/alompo/Documents/inno-spaces/blog-overflow/fitnesse-witness/target/test-classes
Now if you hit the Test button, the test should be successfull and it will look like:
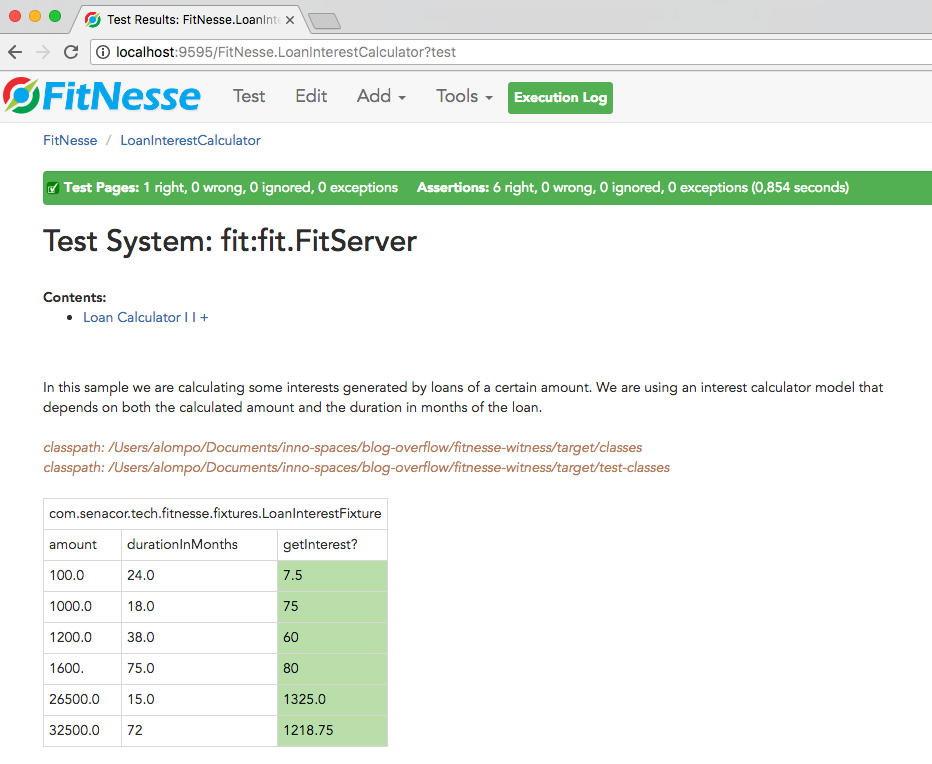
Of course we could add more test cases (with right or wrong expected values) and the FitNesse will tell the truth, only the truth and nothing but the truth.
Epilogue
FitNesse comes with an awesome bunch of documentation that is directly accessible from the wiki itself. By going through that documentation we may see how powerful and versatil FitNesse is. We have seen how easy it is to manipulate, which makes it perfectly customisable and usable by any of our project stakeholders after it is deployed.
FitNesse can be integrated easily with continuous integration tools such as Jenkins/Hudson and combined with Selenium, cucumber, JBehave and other similar tools. It can be totally administered from the frontend or via command line configurations. These aspects can be tackled in the next episode of our FitNesse saga.
Credit for images
Dilbert’s testing strategy:
Fear No Project Blog: User Acceptance Testing – Dealing with Clever Users
FitNesse test systems:
FitNesse User Guide: FitNesse Test Systems.